Unlike some canvas bags on the market that replicate an authentic military persona, our new repurposed military travel tote has seen combat, held military gear, and it’s been in my family for over 50 years.
The Republic of Vietnam, 1969
In the late 1960s my dad was deployed to Vietnam. He came back sometime in 1971, a year before the US withdrew from the conflict. Details from his time in the war are few. For his own reasons, and likely for mine, we never really discussed his experience in the war. From his records, I know that he had earned a bronze star for his service. Many decades later, he told me something I’d never forget: “I wouldn’t do it again for a million, but I wouldn’t trade it for a million, either.”
While he was deployed, he took a few possessions with him. One of them being an oversized military duffle bag that he kept with him at all times. When my family moved from Georgia to Florida, the bag sat in the garage for years housing tools and knick-knacks in one location or another.
Eventually, the duffle bag retired from use. It became a storage unit for things we rarely needed. For me, though, the bag was a piece of my dad that transported me back in time. It's been around the world and back again. It's seen things that I can't imagine, it's been to places far remote and secluded. I think there's something beautiful about that. Objects are meant to be reinvented and experienced in universal ways, and I wanted to find a way to breathe new life into my dad's old miltitary duffle so it could tell stories for another 50 years.
When my dad passed away in 2012, I decided to take the bag with me to New York. Since then, I’ve hauled it across the country and later to Mexico. In late 2022, I met with our team in Leon, Mexico to see if we could create something truly special with it. What we came up with is a truly unique, one-of-a-kind military travel tote that will stand the test of time.
"I wanted to breathe new life into my dad's old military duffle so it could tell more stories for another 50 years."
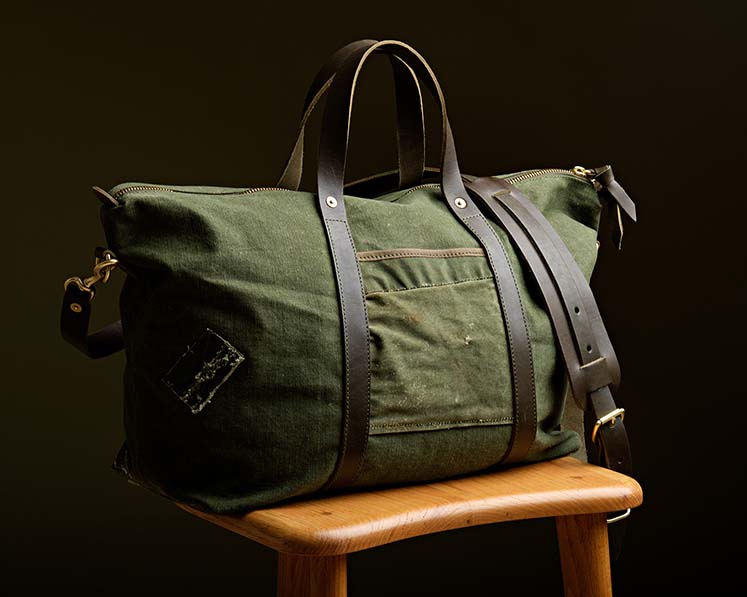
The original bag. Meticulously deconstructed and readied for the next chapter.
Crafting the 1969 Military Travel Tote
Armando is our artisan on the ground. Together, we came up with the idea of using the existing fabric from the old duffle to create a new design for the travel tote. It was imperative for all of us to keep the original rips and tears so the bag would hold it's history and authenticity, but I also wanted to incorporate new luxury finishes so the bag could be elevated to our quality standard. This would also make the bag more versatile for a variety of different occassions. Be it the beach or the road, I wanted the bag to look and perform like a brand new WP Standard product.
STEP 1: MODIFYING THE PATTERN
Working by hand, Armando started with creating new patterns. Since leather and fabric are prepared and set differently, we first had to modify the pattern from our existing Travel Tote Collection in order to make them fit properly. Leather can be cut and stitched, whereas fabric needs to be glued, folded, and then stitched. This makes the process a little more tricky to get right.
STEP 2: CUTTING AND PLACEMENT DRAWING
Next up was finding the perfect areas for the patterns to be cut from. The original duffle is quite large, so we used the open areas on the side to create the new patterns for the military tote. We then drew the placements for the pocket and handles and included an eyelet from the original canvas for the inside pocket. I wanted to use as much of the original bag as we could – from eyelets, rips, straps, and handles.
Dad in Ft. Polk, 1968
STEP 3: GLUING AND STITCHING
To get the pieces ready for stitching, we glued the top and bottom parts of the front and back panels. We did the same thing for the base, back, and front panels to create one whole piece (front-base-back).
With our handles aligned, we glued them together, gave them a stitch, and got our pocket placements ready.
STEP 4: ZIPPING IT UP
Carefully placing the zipper in place, we glued and stitched from the top panel to the back top panel so we could add the zipper. We went with a heavy-duty polished brass zipper with leather tabs at each end. Now the bag can be closed and stitched from the inside out.
Watch our video process on Instagram
DISPATCH
"Dear Mama, Daddy & Bruce,
Made it to Ft Polk Thurs. About 11:30 For A Man with No hair & No Address I'm doing fine.
Love Tony"
The Final Details
This is always my favorite part. There are so many things we can do here. For this bag, we added brass rivets on the handles along with D-rings, an inside keychain made from the original military belt, zipper pullers and carts, and added a long strap for easier travel. We used a rich olive leather for all the straps. This compliments the canvas color along with besting the original cotton webbing. The end result is a truly unique military travel bag that’s durable, stylish, and practical.
I couldn’t be happier with how it turned out. From years in Georgia, Florida, and Vietnam, the repurposed military travel tote bag brings us together through travel, history, and connection. This one's mine, but we are making a limited run with other salvaged military bags. If you're intersted in one for youself, visit the link below.
-RB